Christmas Countdown

Viser innlegg med etiketten Panduro. Vis alle innlegg

onsdag 5. november 2014

Cute Christmas @ I ❤️ ProMarkers

Good Morning to you all.
Time for another challenge over @
I ❤️ ProMarkers

This time with the wonderful
Sherri Baldy 
as sponsor

This week the theme for the challenge is
Cute Christmas

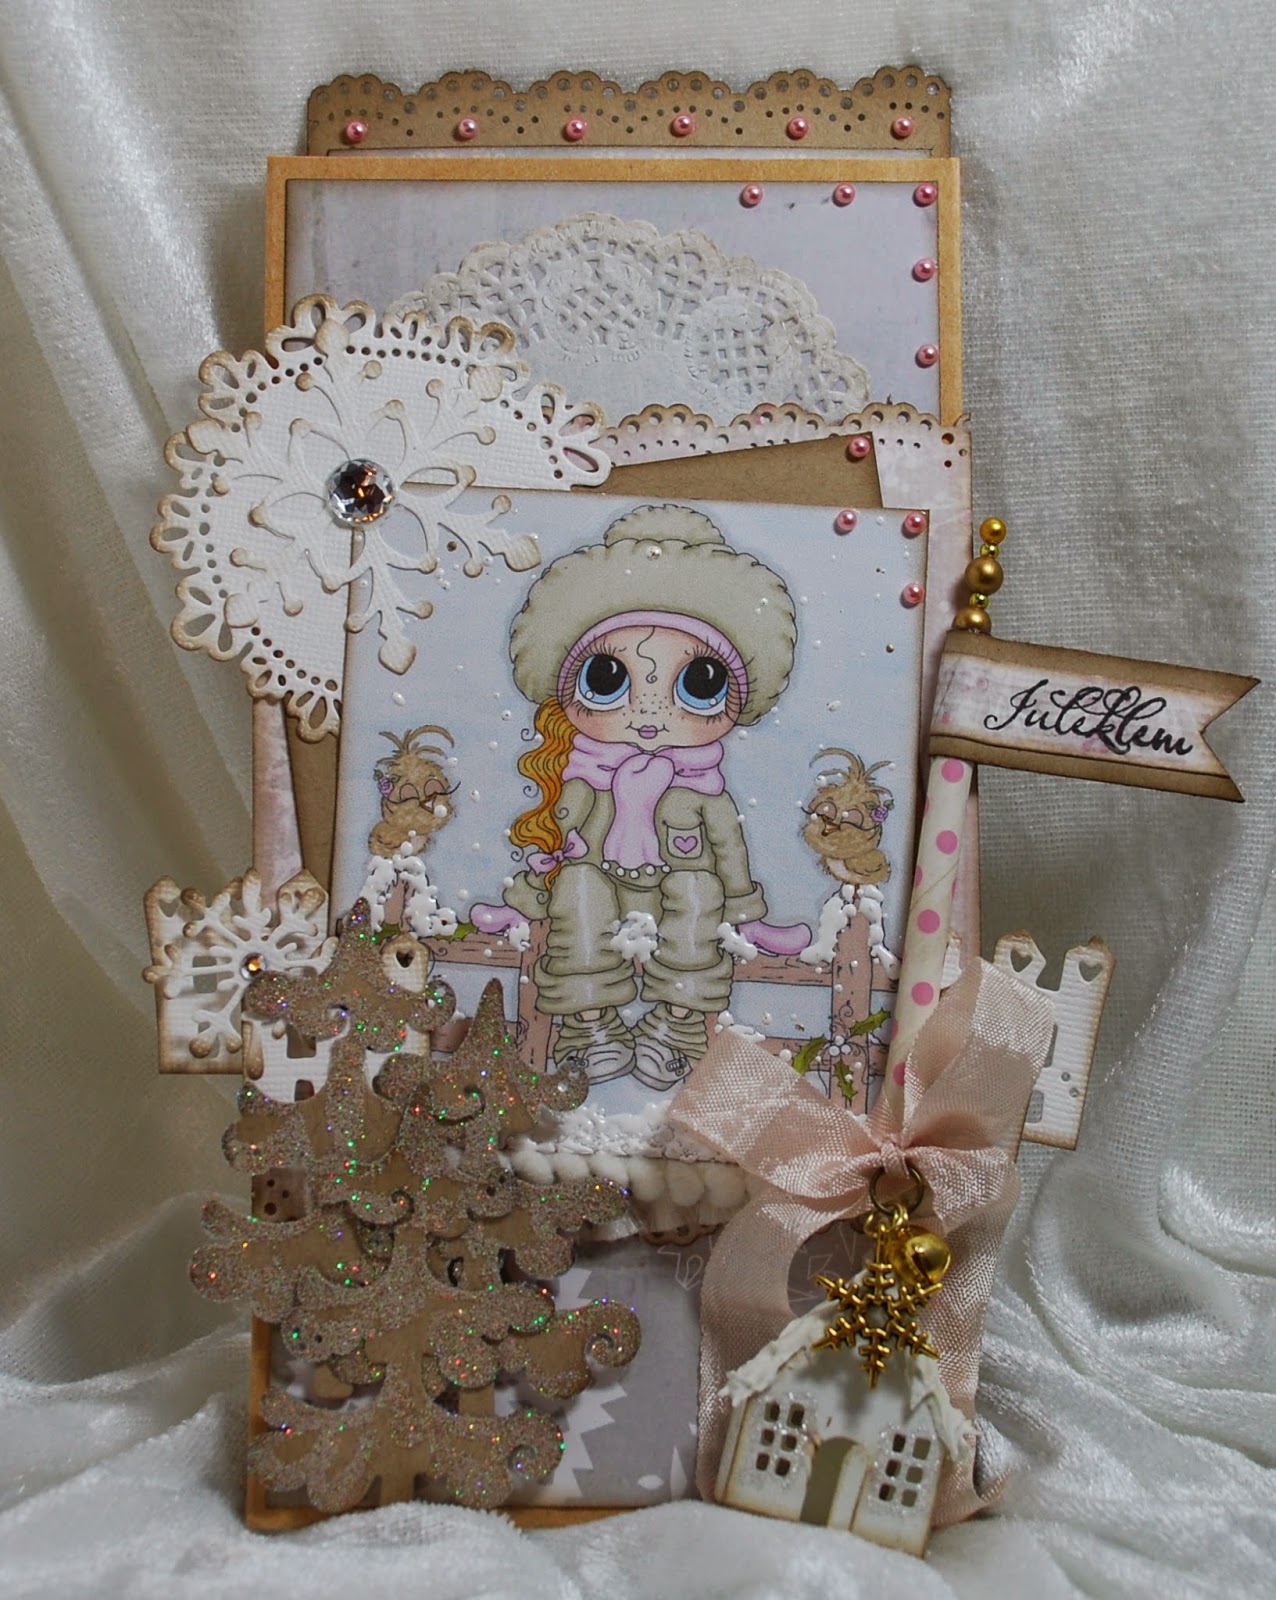
For my Cute Christmas DT-project I made a Paperbag-card.
I used Sherri Baldys My Besties IMG100010 on it.
You can find a list of both ProMarkers I used to colour it, and materials I used on it further down in this post.
Here’s my PaperBag-Card, I hope you like it:

Inlaycard shown too:

One side of the inlaycard has plenty of space for personal greetings:

«The Boring Backs»:


ProMarkers used to colour the image:
Skin: Ivory, Dusky Pink, Tan, Sunkissed Pink
Eyes: Powder Blue
Hair: Mustard, Gold
Clothes: Khaki, Pastel Beige, Blossom, Pale Blossom, Warm Grey1, Warm Grey3, Blender
Birds: Praline, Spice, Almond, Blender
Fence: Tan
Holly: Pear Green, Olive Green
Background: Pastel Blue, Blender

Materials used to make the paperbagcard:
Sherri Baldys My Besties IMG100010
Paperbag
Bazzill cardstock, White and Kraft
DPs: Panduro «Snowflakes in corner», Vibeke Spigseth Poppydesign «Seasons Greetings»
Dies: Magnolia (Fence, Doily, Trees, House, Snowflake small), I can’t remember where the bigger snowflake is from
Punch: Martha Stewart
Textstamps: Ladybug and Friends «Julehilsener», Papirdesign (on the inlay card)
Frantage «Shabby White» and «Chunky White», DistressInk WalnutStain, Sugarcoating Lily White Glitter (Doodlebug design), Aleenes True Snow,
Snowflakecharms, Bells, Paperstraw, Doily, Halfpearls, Seambindingribbon, Blingstones, Homemade Pin

I’ll join this challenges with my Paperbagcard:
Papertake Weekly - Anything Goes Optional Extra Include lots of Sparkle or Glitter
Creative Card Crew #74 - Christmas Joy!
Party Time Tuesdays #188 - Anything goes
Through The Craft Room Door - Anything Goes
Craft- Room Challenge - A Vintage Christmas
Squigglefly #44 - Use Patterned Paper
Dream Valley #94 - Getting Ready For Christmas
Card Mania #59 - Use Your Dies
Stamping Sensations - Christmas
Crafty Calender - It’s All About Christmas
Crafty Hazelnut’s Patterned Paper Challenge - Use Patterned Paper
Brown Sugar #118 - Anything Goes
Crafty Cats #253 - Anything Goes
Sister Act #81 - Anything Goes Cards Only
Hobbygarasjen #19 - Jul i Oktober
Completely Christmas #36 - Anything Goes with a twist Add a Robin
Crafty Hazelnut’s Christmas Challenge #201 - Sparkle
Crafty Hazelnut’s Christmas Challenge Extra - Anything Goes as long as it’s Christmas
Sweet Stampin’ Christmas - Snowflakes
My Besties Deutschland #8 - Alles Geht + Option Weinachten
My Besties UK - Anything Goes & Christmas
My Besties Friendship #7 - Der Winter steht vor der Tür
My Besties Aussie #30 - Let it Snow - Add Snowflakes and Glitter

***

So Long

lørdag 23. mars 2013

Tagbook for Confirmation

Hi again, girls :)
Spring and confirmations seems long ahead - tonight and earlier today we've had some more snow... - but time run fast and before we know it they're both here. And as I've said before; a slow cardmaker like me have to start early. Cards for the boys are the most difficult, so I've started these first :)
Today I'll show you a tagbookcard I've made.
I think the image is from WOJ (hope someone will correct me if I'm wrong).
I cut a 3.1/4" x5" panel of aquarellepaper and punched around it with Martha Stewarts Eyelet Lace PATP-set.
I've coloured it with DistressInk (Reinks and Markers).
Then I inked the edges, like I did with all papers (Pion, Papirdesign and Panduro) and cardstock.
I put lots of halfpearls around the image.
Next picture shows it opened facing the back of it.
I used Kraftcardstock for the labels. Stamped different greetings in the middle and swirls around the edges.

Here's the inside. Tags made of Kraftcardstock. Decorated with stamping and/or papers.
The back of the tags doesn't have any stamping, there one can write more personal greetings :)

Here I've pulled the tags up a bit. I see now that I should have pulled the tag to the right more up, as the stamped greeting are at the bottom of it (funny how much more you see and think of when you see pictures...)

Backside:
I'll enter these challenges:
Creative Card Crew #32 - Masculine
Through The Craft Room Door - Anything Goes
Pause Dream Enjoy Challenges #6 - Anything Goes
Stamp With Fun #203 - Alles Geht


fredag 26. oktober 2012

Another christmascard

I've made another christmascard with a Magnoliaimage. I've used Distressmarkers and -reinks to colour Tilda. One of the DPs are from Panduro. I cut it to make the image on the paper continue on the front and backside of the card.
Then I layered up some more DPs (from the scrapbox) - I used the Martha Stewart Doily Lace Edge Punch on these papers.
On the tag (a Magnolia DooHickey Die) I stamped a christmasgreeting from Kort & Godt.
With the flowers I used a swirl made with a die from Marianne, and some branches made with a Spellbinders-die.
I also tucked a little piece of lace under the paperarrangement and tied a lace to the tag. The tag also has a charm attached.
The inside has the same backingpaper from panduro as I used on the outside. The greetingpanels are made with Spellbinders Labels Fifteen.
The stamped greeting inside the card is from Kreativ Hobby.
Of course I inked the paperedges inside too :)

Here's the list of challenges I'll send this card to:
NSHK #62 - Jul (Christmas)
Just Keep On Creating - Christmas Is Around The Corner
Crafty Ribbons #31 - Christmas
Happy Campers #3 - Shabby Chic
Stampin' For The Weekend #20 - Anything Goes
Magnolia Mania #58 - Drei verschiedene Stanzen

***

mandag 17. september 2012

If the Shoe Fits - DT OLLCB

Good morning to you all :)
Today we have a new challenge for you alt Ooh La La Challenge Blog,
and the theme this time is
"If The Shoe Fits"
A perfect challenge for a shoelover as me - oh, how I wish I'd have shoes like the one I've used in my card!
I'm pretty sure there are more of you shoeloving girls out there, and I hope that you will join in on our challenge this forthnight.

I've used image and paper from the Shoes In Bloom-collection - not easy to choose between all those lovely shoes and papers, but I ended up with this "musical" shoe.
I made the card as an easel-card, and chose not to use too much embellishments and decorations, as I wanted to show the shoe most.
The stamp is from a stampset I've had for ages. The shoebrads were bought at Panduro a looong time ago. They were pink, but I used Versamark inkpad and black embossingpowder to colour them black (think I was pretty clever there ;)
I attached a shoecharm to the black laceribbon.
Behind the picture I placed a black cardboardmatting, and used a black lace beneath the image.


The sentiment says "if the shoe fits: buy one in every colour!"
So girls, I hope you'll take a hop over to Ooh La La Challenge Blog, 
to see what the rest of the DT-girls there have made 
(oooh, there are sooo much lovely to see! - lucky me have had the chance to see it earlier ;),
and join our shoe-challenge.


søndag 1. juli 2012

Napkin Folded Wedding Card

I have made a Napkin folded card.
I wanted to make a wedding card, and wanted a kind of elegant folding.
The Napkin folding and the Magic Card folding are the most elegant folding techniques I know (by now), and for this card I chose the napkin fold.
This technique has lots af folds, a lot of measuring and cutting and a LOT of inking, as I chose to ink all edges on both the cardstock and the papers.
I used DistressInk WalnutStain for the inking.
Around the edges of the cardstock I used a Martha Stewart PATP-set. I used the same set to make the panel on the closing.The closing is made quite simple with a magnet underneath the designpapers.
The designpapers are from MajaDesigns Vintage Summer Basics-collection. I think I used both sides from two different papers.
On the front I only decorated with a greeting (from Papirdesign, I think), a ribbon, some pearls and some flowers.

Here I've opened the "belt":

Here's the card almost wide open,

Here come two pictures that shows the inside closer:


On the tag (Magnolia DooHickey I stamped a weddingimage (Panduro) both on the frontside:

...and on the back. The images are not coloured, only goldembossed:

Here's the list of challenges I'll enter the card into:
Scrappin' All Over - Vintage Wedding
Charisma Cardz - Anything Goes
The Paper Shelter -  Punches and/or Dies
Party Time Tuesdays - Anything Goes
Creative Inspirations - Anything Goes
Sweet Stampin' - Scallops
Delightful Challenges - Celebration
Stampin' for the Weekend - Show us your style

***

tirsdag 5. juni 2012

Confirmationcard in Greytones


Today I have another confirmationcard to show. 
This one is made with a minimum of colours. 
The image, a digistamp from Simply Betty Stamps, is mostly coloured in ProMarkers greytones. 
I used different brownshades for the hair, and green and red for the rose.
I sprayed the cheesecloth I've put under the image with a light bluecoloured glimmermist. 
Around the image I used lots of tiny Liquidpearls. 
The sewing is fake :s I used a needle to make lots of holes around the edges, then I drew line between the holes. 
In the left upper corner I put on som grey halfbeads.
The swirl is made with a Spellbinders die, and painted with glitterpaint.
I also had to put glitter on the roses...
The black-and-white designpaper (rosepatterned) I think is from Papirdesign. 
The textpatterned DP is from Panduro.
I made the card as a kind of Joy-fold-card. I like this foldingtechnique as it is both simple and has a bit style.
On one of the folded insides of the card I stamped a text from Kort&Godt. 
On the other fold I found a really cute poem, that I made into a rub-on, and put on.

Close-up, showing the image:

One of the insides opened:

All insides:

I'll try my luck in these challenges:
Scrappekammeret - Bretteteknikk
Kort o Mania - Going Digi Crazzzy!!!
The Paper Shelter - Vintage or Shabby Chic
I Love ProMarkers - Use a Digi
Simon Says Stamp - Anything Goes
OLLCB - Make it Girly

onsdag 29. februar 2012

Blue Christmascard

Tonight I have a christmascard to show again. I think christmascards is my all-time-favourite cards to make. I always get happy making christmascards :D

I think the papers on this card are from Panduro and MajaDesign. I just love the icy blue colours on these.
The image is Edwin, from Magnolia, coloured with ProMarkers. He's got a little "fur" on his jacket - I think it's soo cute!
I've also used a Martha Stewart edgepunch, Spellbinders Dies Labels Fifteen and Classic Ovals LG, a Magnolia Snowflake doohickey, a Tonic Snowflakepunch, flowers from Wild Orchid, brads, bling and liquid pearls.
I've distressed all edges, using DistressInk WalnutStain.
On the front of the card I sew the panels down.
The texts, both on the front and inside the card is from Kort&Godt.

The inside of the card. I like to put quite large blank panels inside the card, to give space to write a few words...

A close-up of Edwin with a present and a basket full of apples - RED apples for christmas :)
This picture hopefully shows the bling and liquidpearls a bit better:

My blue christmascard will go into these challenges:
Sunday Sketch & Stamp - Sketch
Allsorts Challenge Blog - It's your choice
The Crazy Challenge - Anything Goes

***

tirsdag 14. februar 2012

Magic Wedding Card

For the 4. and last challenge of Anonyme Scrapperes Anonyme Timeglass I've made the card that's been in the back of my mind for the whole challengeperiod. The theme for all challenges have been Valentine or Love, in different variations. This last challenge is a free challenge (but still with the Love/ Valentine theme, though).
I made the card as a Magic Card, the Tutorial is made by Marianne for StampARTic. It is really easy to follow, and I think these cards are truly wonderful, and perfect for weddingcards (and for birthdaycards, and christmascards and... the list goes on and on...)
I used a picture from a Valentinemagazine I think I bought last year (but as quickly as the years go by, it might just as well be three years ago...) I cut it out and distressed the edges - like I did to all edges, With DistressInk WalnutStain.
I used a Martha Stewart edgepunch along the edges.
The textstamps are from Papirdesign ("Til brudeparet"). On the frontside I embossed the texts with gold embossingpowder, the I cut out the text and rings - using both scissors and knives, a h*** of a job!!!
Inside the card I used Spellbinders Labels Four for the panels.
That should be about it...

Here comes the card, first the front, standing. Then the inside, and at last the back of the card:


I have had so much fun making the projects for the four challenges at Anonyme Scrappere. I considered it well before I joined the challenge, well aware that I wouldn't have as much time as I use to, or like to, for the challenges, but I also felt that the timeaspect was a challenge in itself, that I could need. Now I know that I can work quite fast - if I need :)

I'll enter the Magic Wedding Card into the following challenges as well:
DYSU #58 - Love
PaperPlay Challenges - Love Letters
Papertake Weekly - Anything Goes
and Of Course:
Anonyme Scrapperes Anonyme Timeglass

***


tirsdag 10. januar 2012

One Layer Card

Haven't I been brave! I've made an One-layer-card!

Ever since I saw the One-Layer-Card-Challenge at Ett Trykk - Norsk Stempelblads blog I have wanted to try to make one. It scared me a bit, especially the part about stamping directly to the cardstock - it didn't give much room for mistakes...
I spent some time thinking over how I wanted the card to be, not being able to make any bigger changes as I went on...
I masked the motive together, both images, text and the sentiment on the envelope. I used pencils for colouring this time (many images since I used pencils...)
The snowflakes are stamped with Versamark, then heatembossed with white embossingpowder. I also used a white Sakura Glaze pen and doodled in some tiny white dots here and there.
The snow Tilda is sitting on (or in...) is Aleene's True Snow, painted on with a spatula (it shows better in a picture further down).
On the envelope I stamped the same image and the sentiment "God Jul" (Merry christmas), and heatembossed it with clear embossingpowder (also in a picture furter down).
All in all, i'm quite pleased with how it turned out :)


The Challenges I'll send my One-Layer-Card to:
Ett Trykk - One Layer Card
Magnolia Stamp Lovers - Kraft
MDUC #128 - Anything Goes
Creative Belli #134 - Snowflakes
Heidis Hobbystuggu - Vinter
Stamp, Scrap & Doodle Saturdays - Winter Something
Gingerloft Challenge #31 - Anything Goes
Papiravisen - Vinterdrøm

***

lørdag 31. desember 2011

White and Grey New Years Card

I have to admit I didn't manage to make all christmascards I should have made before christmas (I sold too many at the christmasfair - can't be sorry about that, can I!), so when I heard that someone would be away for the christmasdays, I felt a bit happy - that would give me better time to make a New Year Card instead - I like to have plenty of time making a card...
But yet - though I was glad I got better time making it, I still feel kind of sad I didn't get a card out in time for christmas, and that is why I used this little Tilda-image, I think she looks both shy and excusable, and very, very cute :)
I've used papers and embellishments in white and greytones, and sprayed everything with Glimmermist (Snow Queen and Dazzling Diamonds). The swirls are made of corrugated paper, cut with a Die from Marianne Design, then I stole a greyglittery nailpolish from Hedda to paint it over with (will she ever, ever use a GREY nailpolish, although it glitters!!!)

I'm really sorry that the pictures are a bit too dark - I never seem to catch the few minutes of daylight that I should have used taking photos...


Happy New Year to:
TOMIC #30 - Happy New Year
Papirdokkene #18 - BINGO (Høyre vannrett, Glimmermist, Tall, Bølgepapp)
I Love ProMarkers #97 - Anything Goes
Secret Crafter Saturday Challenge #166 - Anything Goes
C.R.A.F.T. Challenge #135 - New Year
Paper Pretties - New Year


And a Happy New Year to all Readers and to my loved Followers, I really appreciate all your visits and comments.


tirsdag 6. september 2011

Easel-Stair-Christmas-Card

I really loved the folding Maja has made on her Easel-stair-card. I had to visit her blog several times to try to figure out how she had made the card - mine may not be made the exact same way, but I'm quite happy how it turned out in the end :D
And - I finally found use of my "Last Christmas"-stamp (Magnolia) -that was also a part of the inspiration. We sat watching christmassongs on Youtube (me and Hedda), and Wham's Last Christmas was one of the videos we watched - then, hearing/ wathing it, the whole idea of this card popped into my head :D
(NO - I do NOT think it is too early listening to christmassongs!)
This picture shows the card folded together - Tilda and Edwin a bit closer...
:)
Here's the inside of the card. I've used the same papers as on the outside.
I've used a "Mini bags & Tags" from Melissa Frances. I tied a ribbon to the tag inside the pocket - both for decoration, and for showing that "here is something more".

This will be my first Septemberchristmascard for Hjertebodens Juleblogg (I have the next two ready for posting in short time :D)
I'll also enter it into Christmas Stampin' All Year Long's challenge "try a new fold"
(this is a new folding to me at least...)


Material list:
Cardstock: Bazzill
DPs: Panduro
Stamps: Magnolia, BoBunny
Textstamps inside: Heindesign, Ladybug and Friends
Ink: Adirondack Earthtones Espresso, Versamark, DistressInk PumiceStone and WalnutStain
Colouring: ProMarkers
Spellbinders Fancy Tags
Embossing Powder (Clear)
Liquid Appliqué
Snow Marker
Sakura Glaze Pen
MiniBags & Tags (melissa Frances)
Ribbon

***

mandag 22. august 2011

Pink Christening Card

Next weekend we're invited to a christening, so I've made a card to the sweet little babygirl :)
I love working in pink, and here I felt I almost brought it to the limit of how much pink one can use in a card :s
(If you look closely you can see a little white here and there)
I made the card as a crisscrosscard, very inspired by Lena Katrines crisscrosscard in bluetones.
She has the most inspiring blog you can imagine. It's well worth a visit (almost every day), and a place in your sidebar.
Inside the "crisscross" I have the card where we can write (or stamp) the greeting, this card is also pink, pink, pink...


I decorated the back of the cards, as well. All these papers and embelli'es makes it really heavy, so I'm kind of happy I don't have so send it by mail - :D LOL :D

As always - I may have read too fast/ too little through the rules of some challengeblogs, or have mixed rules from some challenges, so with the fear of getting excluded, I'll try my luck in these challenges:

Sweet Stampin' - Babies & Little ones
Stampavie and more - Girlie
CropStop - Pearls
Card Makin Mamas - Pink
Papertake Weekly - Bingo (I have 2 rows; Free/ Pearls/ Blooms and Pearls/ Ribbon/ Free)
Creative Craft World - For a child
My Time To Craft - G is for... (Girlie, of course :D)
Try it on Tuesday - Anything Goes
Sukkersøtt - Monokromatisk


Here's what I used for the christening card:
Cardstock: Bazzill
DP's: Panduro
Ink: Adirondack Earthtones Espresso, Colorbox Rosebud
Stampimage: Magnolia
Text: an old rub-on
Colouring: ProMarkers
Spellbinders Labels Four and Fancy Tags
Martha Stewart edge puncher
Roses
Leaves
Rhinestones
Halfbeads
Pearlstamens
Ribbon
Charm
Safetypin
Crystalstickles
Sakura Gelpen
and at the back; my personal "Handmade by Lisbeth"-stamp (which Papirdesign in Bodø made for me, when they had a shop there)

***