Christmas Countdown

onsdag 27. juni 2012

Summer Birthday Card

I have tried to make a bright summerbirthdaycard.
 Not having much of a summerlike weather where I live, one can need some warm colours when crafting.

The colour-challenge at Sketchy Colors inspired me to use such bright colours - not colours I normally use, but seeing this, and other summerlike challenges, 
I decided to take a little step outside my comfortzone, and try.

To help me on the way I found the sketch at Sketchy Challenges - one can need a little help when one's trying something new...
The image is one of my beloved Magnolias, coloured with ProMarkers, in a lot of yellowcolours blended together.
I've used dies from Spellbinders and MarianneDesign. 
The greetings are from Kort&Godt (frontside) and NorthStarStamps (inside).
I've put a Glimmermistsprayed doily behind the circlepanel.
The flowers are sprayed with the same Glimmermist (SunSisters).
The papers are from two different paperpads - BasicGrey "picadilly" and a free pad from Cardmaking & Papercraft "The Country Diary Of An Edwarian Lady".

Inside the card I put on a round greetingpanel on the left side, and a pocket with a tag on the right side.

I'll enter the card into these challenges:
Sketchy Colors - Colour Challenge (Orange, White & Green)
The Corrosive Challenge Blog - Summertime Girls
I Love ProMarkers - Anything Goes
Just Magnolia - Summer Colours
Creatalicious Challenges - Anything Goes
Deep Ocean - Welcome Summer
Delightful Challenges - Anything Goes
Totally Gorjuss - Something Yellow (Tildas Dress is most yellow)
Allsorts - Any Die Will Do
NSHK - Sommer og Sol og noe Gult (Summer, Sun and something Yellow)


***
 

mandag 25. juni 2012

Christmas in June

Yesterday I finally managed to photograph this months christmascards.
I am so happy to still be in the challenge at Hjertebodens Juleblogg, where they want us to make three christmascards/ -projects each month. I know that it may be hard to find the right spirit to make christmascards for the next couple of months, but with som nice christmasmusic, an inspirational magazine and som lighted candles I'm sure I'll find the christmasspirit ;)
This months challenge at Hjertebodens Juleblogg was "Vintage Look", and I've done my best to make vintage christmascards - though I must say they may look more shabby-vintage than just vintage...

On this first one I've used a Magnolia-image, papers from Magnolia and also a Magnolia DooHickey. Other dies are Spellbinders. The border on the backing panel is made with a Martha Stewart punch. All edges are distressed and inked with DistressInk Walnut Stain.
This image is one of the first I've coloured with my new DistressMarkers.
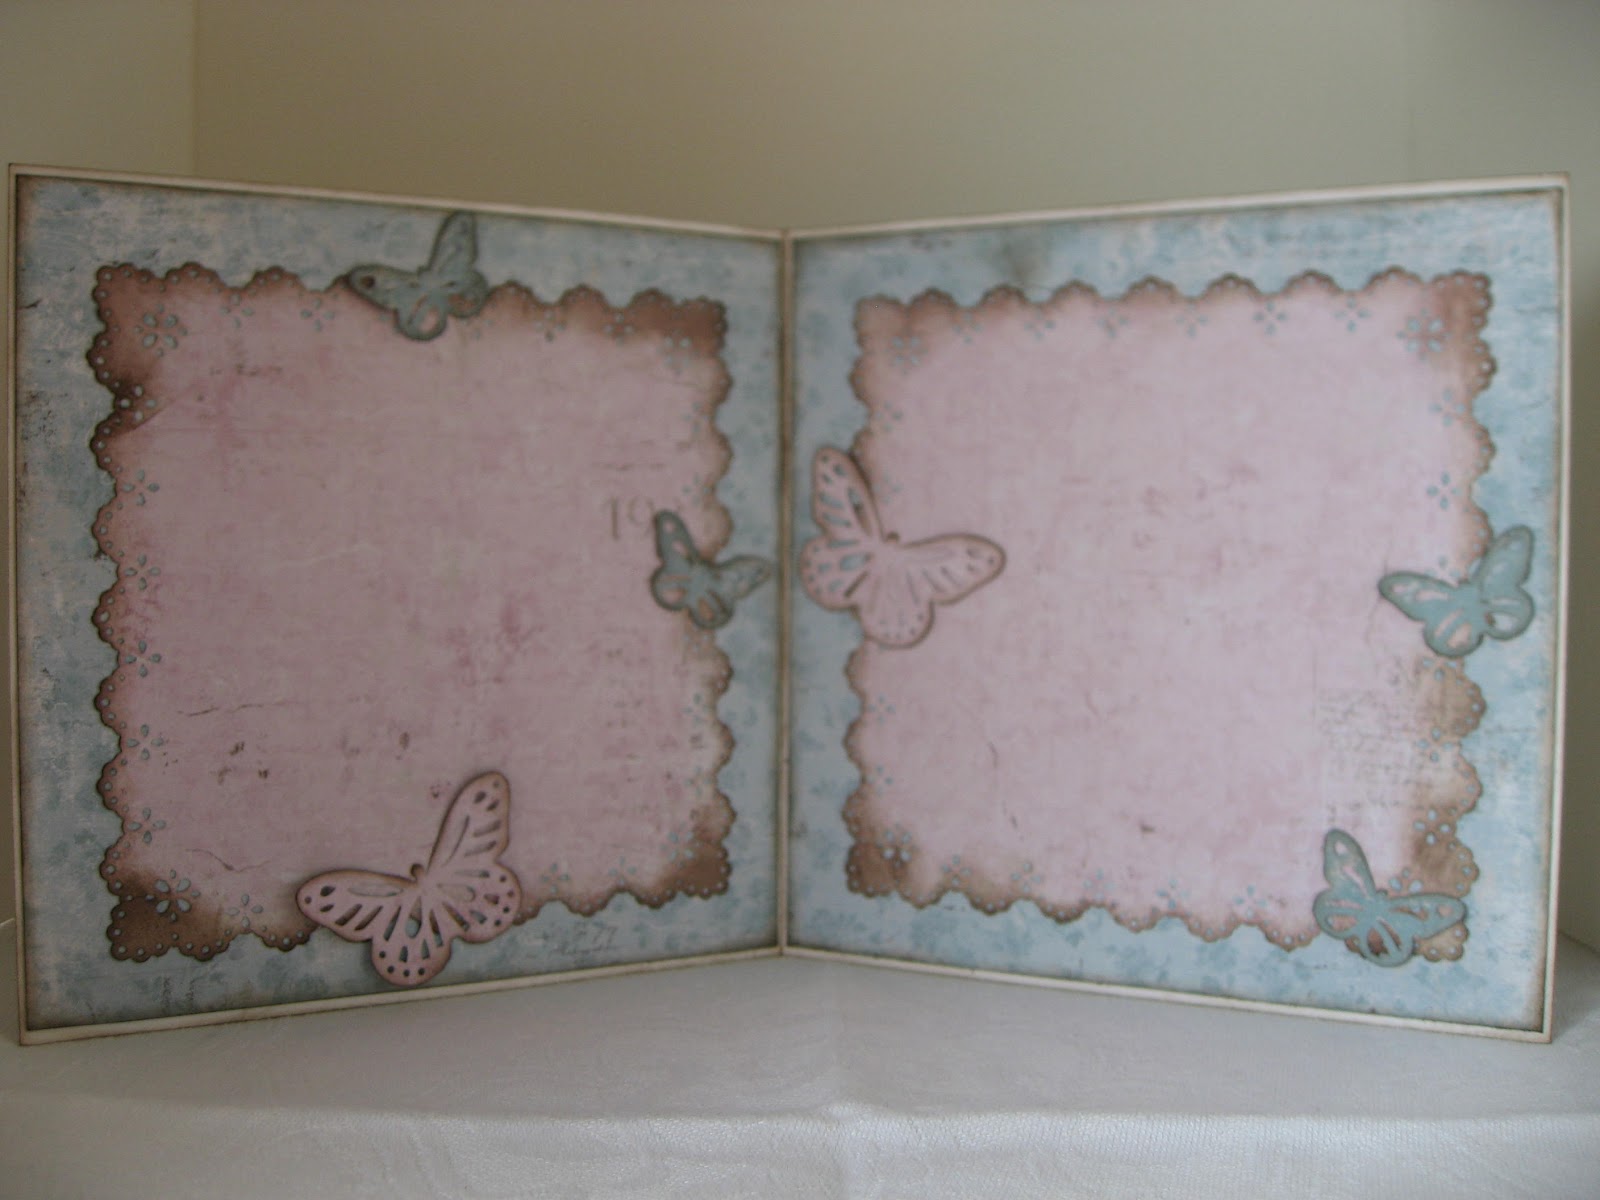
Inside I used the same sketch as on the frontside, but skipped the decorations. 
The text is from Kreativ Hobby.
My first christmascard also go for the challenges at:
PaperPlay Challenges - Use a die (I think I've used 4 different dies here)
Allsorts - Any Die Will Do


My second card is an easelcard. I used a magnolia-image here too. The designpapers are from Papirdesign (I think). One of them I painted over with thin white paint, to get a lighter, whitewashed look on the "wood". 
The text is from North Star Stamps and the "God Jul"-Greeting is fromPapirdesign, the little greeting on the tag is from Ladybug & Friends.
The swirl and the leaves are whitepainted, the white poinsettiaflower I painted with GlimmerGlam glitterpain "Chandelier".
Of course I used DistressInk WalnutStain on all edges.

On this image I'm back to ProMarkers again :)
Here's the card opened. It has quite a large writingpanel...
My second christmascard will be entered into these challenges:
CHNC - Let's get Inky
Crimbo Crackers - Anything Goes


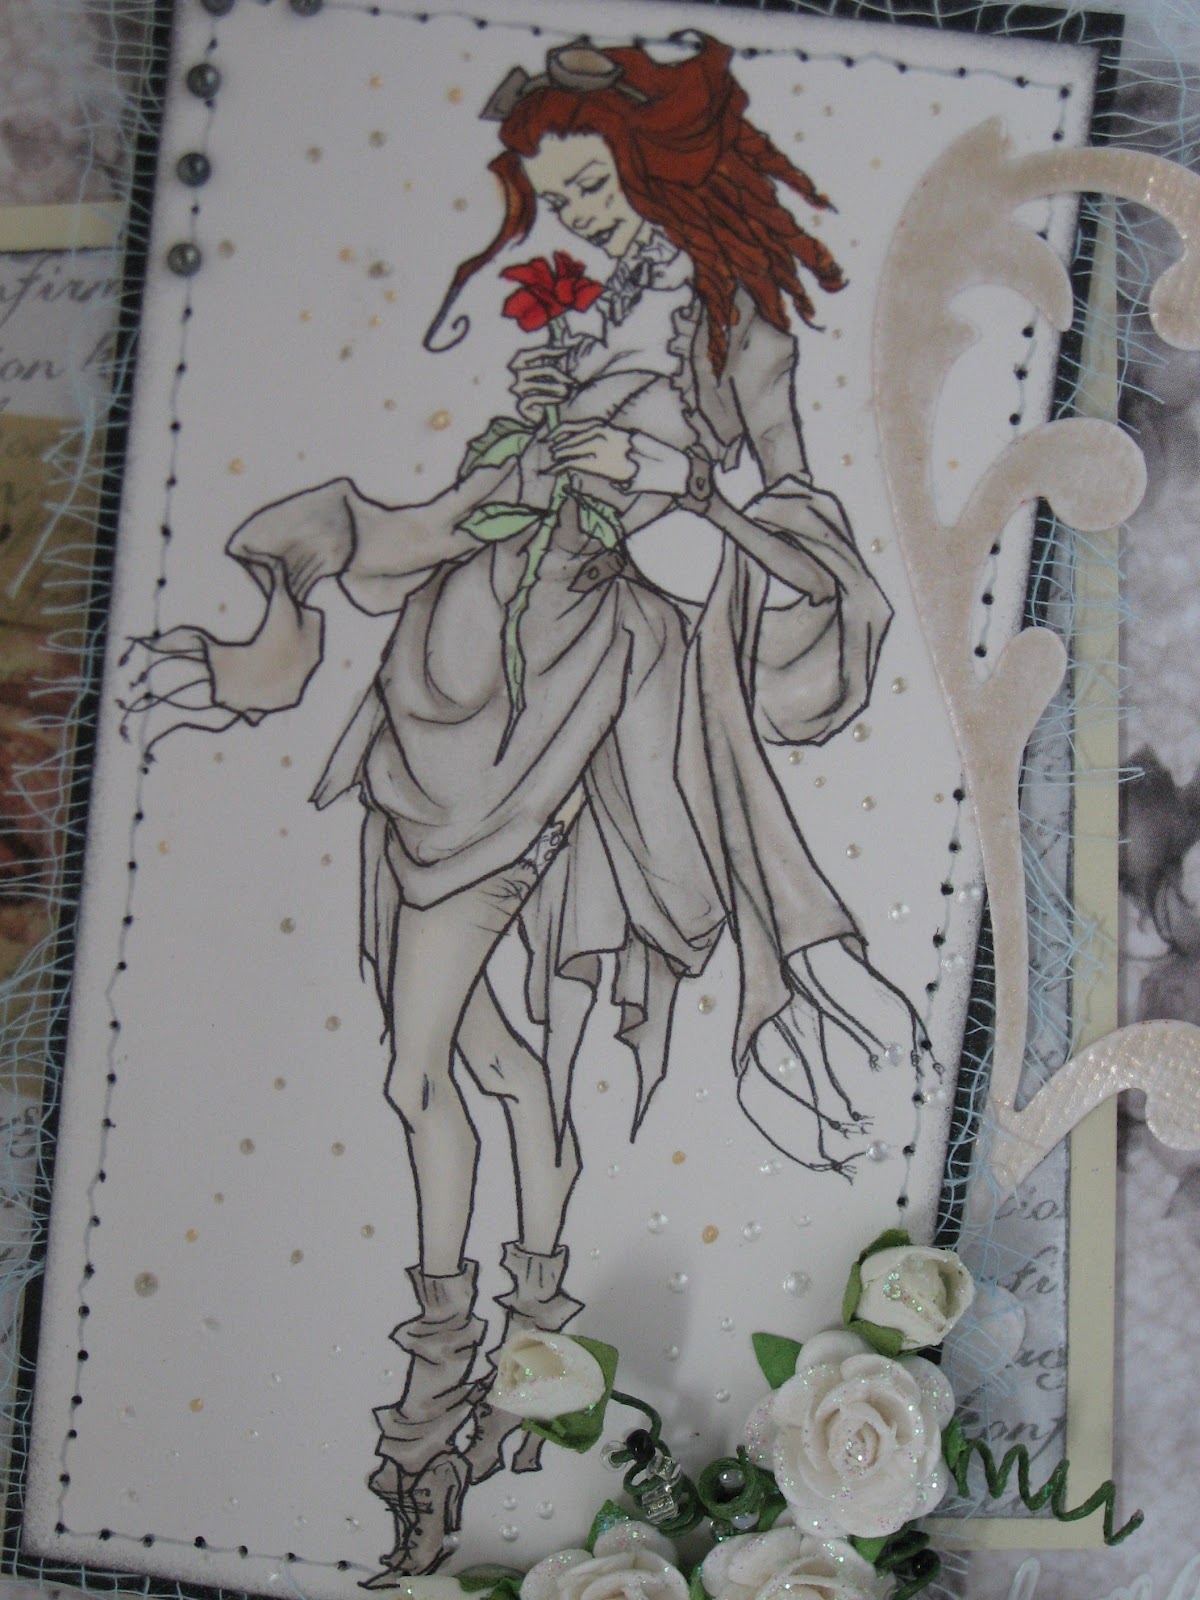
On my third card I used Edwin (also a Magnolia-image), this one too is coloured with ProMarkers. I used several redtones to mix what I felt was the right redtone for his suit.
Papers on this card is from MajaDesign
On the furry parts of the suit I used Glitter Stickles Diamond, so in the right light it really sparkles.
Around the image I put on lots of tiny pearls, made with Liquid Pearls White Opal. Between the image and the doily I put some cheesecloth and a piece of lace. I used a lacy punch (Martha Stewart) on one of the backing panels on this card too.
The tag can be pulled out, and has a little greeting (from Kort&Godt):

The "Top"-inside has a greeting from Norsk Stempelblad AS.
The border on the greetingpanel is made with a Nellie's-die (DistressInk WalnutStain on all edges inside as well):
The lower part of the inside, plenty of space for a personal christmasgreeting:
The backside, just waiting for my personal stamp:
I'll enter my third christmascard into these challenges too:
Tilda's Town - Edwin


I actually made four vintage looking christmascards this month :)
The fourth is more clean and simple - here I let the papers do most of the job ;)
On this one I used an image from a PionDesign-paper. The papers and tags are also Pions.
I put on a little cheesecloth, lace and some flowers, and stamped a greeting on one of the tags.
Again, all edges are inked with DistressInk WalnutStain.
Inside the card I used the same paper, and stamped a christmaspoem onto it:
Close-up of the poem:
...and here's the backside:


Thanks a lot for stopping by, I really appreciate all visits and comments 
:)


torsdag 21. juni 2012

Summer Holiday

Today was the last day at school, a day both of my kids have waited a long time for now :)
From tomorrow there won't be any homework, they can sleep longer in the mornings and stay up late in the evenings. 
I, myself, have most longed for the "no homework"-part...
At the end of each schoolyear we make cards for the teachers. Well  - I make the cards, but they choose papers, embellishments, images, colours and so on...
For these cards we found images from Sureya DeviantART (I had to "guide" Sander to choose the right image - I think this boy, throwing his books, is such a perfect image for him. Not that he actually threw the books, but boy, does he appreciate every day off - and I'm pretty sure he won't think of opening a book for the next two months!
Hedda, on the other hand, chose an image that she probably felt pictured herself more. She was particularly concerned about the hair... (and that her eyes should be green).
Both images are coloured with ProMarkers.
She was also the one who said we HAD to use rhinestones (I had planned to use halbeads, but she didn't find them sparkling enough :D)
The papers are from different producers - I keep all "schoolpapers" in a folder, not organized by producers).

Here's the challenges I'll enter Heddas card (the red card) into:
Creatalicious Challenges - Anything Goes
Crafts and Me - Anything Goes
Delightful Challenges - Anything Goes


And here's the challenges I'll send Sanders card (the blue card) to:
CLP - Sketch
Scrap'a'Long - Sommer (Summer)
Totally Gorjuss - Holiday
Deep Ocean - Welcome Summer


tirsdag 19. juni 2012

Summer Wishes

In spite of the weather and temperatures we have in my part of the country,  I wanted to make a summercard. 
Looking through my Magnoliaimages, I felt a little "mock" from some of them (especially the bathing-dressed ones), so I chose this adorable flowergiving Tilda :)
Last Saturday I got my new DistressMarkers, and (of course!) had to try them immediately. 
It was real fun trying them, but, for now, I think I'll stick to my beloved ProMarkers...
The papers are from MajaDesigns Vintage Summer Basics collection.
The fence in front of the image is a Magnolia DooHicky Die. The white painted leaves are from a Spellbinders set (Foliage). The butterflies, on both in-and outside are made with Martha Stewart punches. The butterfly on the frontside has got a solid layer of glitterstickles in the sticklescolours as close to the papers colours I could find  (cottonCandy and BabyBlue).
I gave the roses a touch of  Diamond Glitterstickles.
All paperedges are lightly distressed, then inked with DistressInk WalnutStain.
Behind the image you can see the cheesecloth.

on this close-up you might see the LiquidPearls (WhiteOpal)


Here's the inside of the card - I used a Martha Stewart PATP-set for the writing panels:


To make the backside of the card I used the same sketch, from Sketchy Colors, as on the front:


A lot of challenges inspired me to make this summercard, 
and helped me decide what to use and how to use it. 
Here they are:
Sketchy Colors - Sketch
Simply Magnolia - Garden Blooms
Magnolia Stamp Lovers - Distressed Challenge
MDUC - Bingo ( Die Cuts/ Cheesecloth/ Tilda/ and Paint/ Pearls/ Lace/Ribbon)
Tilda's Town - Lazy Days of Summer
Scrapperiket - Vintage
Sweet Stampin' - Summer Fun
Card and Scrap - Brug Roser (Use Roses)
Vintage Udfordring - Brug Stempler (Use Stamps)
Creatalicious Challenges - Anything Goes
 Scrappekammeret - SOMMAR! (SUMMER!)
Scrap'a'Long - Sommer (Summer)

I hope I haven't broken too many rules entering the card into all these challenges - I love challenges, but sometimes I mix up the rules... I'm really sorry if I've done it now ;)

Thanks a lot for stopping by, I hope you've liked what you've seen

***

onsdag 13. juni 2012

A Boys Card

Tonight I'll show you a boyscard that I've tried to make in a "shabby-Vintage"-style.
I found this wonderful image at Sureya DeviantARTs gallery.
There are lots and lots of this kind of images. I ended up choosing this guy, and coloured him with Pro- and FlexMarkers.
The designpapers are from FabScraps, behind the image I've used a handmade paper - the flowers in the paper are actually real flowers, put in it in the makingprosess, cute, what?
All papers are distressed and inked (DistressInk BlackSoot).
The tag is made with a MagnoliaDooHickey, it has also got inked edge - an a charm on the twine tied to it.
It took me quite some time to decide to put on the laces and the cheesecloth - I've never used it on a boys card before. On this card I felt it was right, somehow...
The swirls are made with a die from theSpellbinders Twisted Metal Tags and Accents-set.
Finally I put on some grey halfbeads.

The card closed, only the frontside showing:

Close-up of the super image, isn't he both cute and cool...:

I'll enter the card into these challenges:

Sketch Saturday - Sketch
The Crafty Pad - Let's Hear It For The Boys
Crafty Creations - How Charming
Passion for ProMarkers - Lots of Layers
Cutie Pie - Real or Faux Stitching (I have faux stitching around the image)
Here Come the Boys - More Than One Fold
Kort o Mania - Going Digi Crazzzy!!!

***

torsdag 7. juni 2012

Another Confirmationcard

Good morning, everyone :D
Today I have another confirmationcard to show you.
This one I made after the sketch at Alota Rubber Stamps. Together with the textpaper from Papirdesign I used papers from MajaDesigns Vintage Summer Collection - I think they are sooo lovely! Almost to pretty to cut  to pieces...
All edges, both papers and cardstock, have distressed and inked edges (DistressInk WalnutStain)
Tilda is coloured with ProMarkers, and has got a piece of cheesecloth underneath.
The butterflies have also got inked edges. The one on the frontside has got a layer of glitterpaint as well.
I simply love this Martha Stewart Butterflypunch, and use it on most everything I make. I might have to put it away for a while...
The ribbon has a lovely Confirmationtext. On this card I've used it in it's original cream colour. I've bought several metres of this colour, and just use the ProMarkers to colour it, when I need a different colour :)
I've used a Spellbinders die (Labels Four), for the panel underneath Tilda (and for the text- and greetingpanel inside the card).
Around Tilda I've put on Liquid Pearls (White Opal).
I've also used a MS heartpunch, a pin, a few flowers (of course!) and some swirled strings, and a charm with a congratulationtext.

Close-up of Tilda:

The inside, made using the same sketch and papers. The text is from Papirdesign.

A close-up showing the inside text:

...and the panel to write a personal greeting:

Here's the challenges I'll enter the card into:
Just Magnolia - Anything Goes
Midweek Magnolias - Anything Goes
Papertake Weekly - Anything Goes
ProMarker Norge - Pastellfarger
Totally Papercrafts - Folds, folds and more folds
Try it on Tuesday - Anything Goes
Let's Ink It Up - Use your favourite Embellishments


tirsdag 5. juni 2012

Confirmationcard in Greytones


Today I have another confirmationcard to show. 
This one is made with a minimum of colours. 
The image, a digistamp from Simply Betty Stamps, is mostly coloured in ProMarkers greytones. 
I used different brownshades for the hair, and green and red for the rose.
I sprayed the cheesecloth I've put under the image with a light bluecoloured glimmermist. 
Around the image I used lots of tiny Liquidpearls. 
The sewing is fake :s I used a needle to make lots of holes around the edges, then I drew line between the holes. 
In the left upper corner I put on som grey halfbeads.
The swirl is made with a Spellbinders die, and painted with glitterpaint.
I also had to put glitter on the roses...
The black-and-white designpaper (rosepatterned) I think is from Papirdesign. 
The textpatterned DP is from Panduro.
I made the card as a kind of Joy-fold-card. I like this foldingtechnique as it is both simple and has a bit style.
On one of the folded insides of the card I stamped a text from Kort&Godt. 
On the other fold I found a really cute poem, that I made into a rub-on, and put on.

Close-up, showing the image:

One of the insides opened:

All insides:

I'll try my luck in these challenges:
Scrappekammeret - Bretteteknikk
Kort o Mania - Going Digi Crazzzy!!!
The Paper Shelter - Vintage or Shabby Chic
I Love ProMarkers - Use a Digi
Simon Says Stamp - Anything Goes
OLLCB - Make it Girly

mandag 4. juni 2012

Footballbirthdayboy

Last week one of Sanders friends was celebrating his birthday, and here's the card I made for him. This time I coloured the boy (a digi from KennyK), with ProMarkers, in red, blue and grey - I'm soo bored of colouring all footballboys in orange and black, like their teamcolours!
The green paper I think is from Papirdesign, the blue with footballs on is a fabric-kind-of-paper I bought many years ago, but haven't find the use for until now.
I made the background to the image with Bazzill cardstock and an old footballstamp - I think this little stamp is my absolutely most used single stamp.
The football in the left corner is cut from a paper/ cardstock. I put a similar on the backside of the card, then attached them together using a "gun" that shoots that kind of plastictaggers that hold socks together (and pricetags to clothes).
All white edges are inked with DistressInk BlackSoot.

Close-up of the image:

To make the "easelpart" stand up I put on two fotballbrads:

I'll enter the card into the following challenges:
Delightful Challenges - Red, White, Blue
Passion for ProMarkers - Inspiration Photo
I Love ProMarkers - Use a Digi
Tuesday Throwdown - Masculine

***

søndag 3. juni 2012

Mermaid-Tilda BirthdayCard

Today I'll show you a project that I've wanted to do for quite a long time, but been afraid it would be too difficult. It wasn't difficult at all! In fact, the trickiest part was to find the blue hairgel I used inside the plasticbag on top of the image, to picture that Mermaid-Tilda is swimming under the water. (Actually I found the gel in Heddas room - she really has some stuff inside there that is quite useful for me...)
The sketch I've used for this card is from the Lovely hÄnglar or Sweet Magnolia Challenge-Blog.
The designpapers are mainly from MajaDesign, I think they're from the "Life by the Sea"-collection.
I've used DistressInk WalnutStain on all paperedges, after distressing them just a littlelittle bit.
I've used dies from Spellbinders, Nellies, Marianne and Joy!Crafts
Tilda, and the seaweed around her (Also stampimages from Magnolia) are coloured with ProMarkers (I may have used a couple of FlexMarkers, as well...)
I painted over the swirls with GlimmerGlam Glitterpaint "Chandelier".
The greeting (from Kort&Godt) is stamped on a heart made with a Joy!Craft-die. 
...and isn't that seahorsecharm just adorable??? I love it!
Underneath the heart I put a little cheesecloth.

Close-up showing Tilda in the water, in the right bottom edge of the picture you can - if you take a real close look - see a little punched seahorse as well (Martha Stewart punch):

Inside the card I used the same sketch as inspiration, the text here is from North Star Stamps:


The backside. Simple decorated, but luckily the papers from MajaDesign are quite heavy, so they give the back of the card the weight it needs to prevent the card to fall forward, as the front of it is heavy (!):

Here's the list of challenges that I'll send my "Watercard" to:

Magnolia-licious Highlites - Water, Water Everywhere
Dutch Magnolia Lovers - Foto inspiratie
Tildas Town - Use a Magnolia Accessory Stamp with Edwin or Tilda
Kaboodle Doodles - Anything Goes
Paper Pretties - Use Summer as your Inspiration
Simon Says Stamp! - Anything Goes

***